Monday, February 28, 2011

Build a Blossom Stamp

I made this card at my recent Scrapbooking Day with Friends. We all get together once a month and rent a hall for a good day of scrapbooking, snacking, and gossip. I unfortunately had to miss a good part of the day due to a prior commitment so I only got to complete one project. This card is for my up coming Stampin' Up gatherings I have this month. Some of the ladies had requested a card made using the new Build a Blossom stamp set and punch. I will be honest I didn't really care for this stamp set in the beginning and didn't think I would have a need for it. Now after playing with it I have changed my mind. I really do love how beautiful the flower turned out and really how simple it was to put together. 

The base of the card is made from Very Vanilla cardstock. I then took some Peach Parfait paper and ran it through the cuttlebug using a Simple Dot embossing folder. I cut a square out of Very Vanilla cardstock and a slightly smaller square from Peach Parfait. I used this square to build my flower on. The petals are stamped with Peach Parfait ink and Tangerine Tango ink using a Rock 'n' Roll Technique. I punched out the petal with the Build a Blossom punch and then used the round end of one of my tools to work the petal on a mat so that it gave it some shape. I used the Versamark marker to colour in the middle of each petal, then took some Dazzling Diamonds embossing powder to give it a bit of shimmer. I stamped out two large leaves using Pear Pizzaz ink on some Pear Pizzaz cardstock, then punched it out with the Build a Blossom punch. The centre of the flower is one of the flower buttons that are part of a Sell-a-bration kit. I tied a small amount of yellow embroidery floss through the holes to finish off the flower. The "For You" is stamped from a old stamp set Flexible Phrases and I used the Mini Tag punch to punch it out. The ribbon is Very Vanilla 1/8" Taffeta ribbon. I finished off the card with three small Bella Bling Dots. 

I love how this card came together and look forward to sharing it with my Stampin Six Groups.

I was able to enter my card in the Challenge at Stamp Something. The challenge was to have flowers somewhere on your card.

ENJOY!! 

Tuesday, February 15, 2011

Sew Sweet Mother's Day Card Class


Sew Sweet Mother's Day Card Class
Date: Saturday, March 5, 2011
Time: 11:30 am
Location: DAT'S Scrapbooking
Cost: $7.00

At this class we will be playing with some of Stampin' Up new Designer Fabric. We will also be using a sewing machine to sew on the card. We will be working with the new Sew Fabulous Stamp Set and water colour crayons. 


The flower is made from an old pattern and a flower die cut. 

This card is perfect for Mother's Day or it could also make a great Birthday Card. On the inside we will learn how to do a masking technique to get the spool of thread to sit behind the other one. I will bring a variety of stamps to use on the inside. This way you can choose the right stamp for which every occasion you plan to use the card for.


ENJOY!

I made Top 5...


I am proud to say that my sympathy card made the top 5 list at ABC Challenge. Thanks ladies for a great challenge and I am look forward to getting back into doing some more challenges.

Tuesday, February 8, 2011

With Sympathy


I needed to make two sympathy cards today. One for a co-worker who lost her dad and one for my husband's co-worker who lost his mom. They are never my favourite type of cards to make, so I find I keep them rather simple. I made a oval using the largest oval Nestabilitie that I had in some scrap paper and used it as a mask to make the background. I used a combination of Going Grey ink and Basic Black ink with a sponge to create the smokey background. I also masked the bottom 1/3 of the oval with another scrap of paper to create the horizon line. I then stamped the trees from Stampin' Up's "Lovely as a Tree" stamp set, in Basic Black. I finished of the card with some black organza ribbon and a simple with sympathy stamp.


Here is the inside of the card. 

I was able to enter my card at the ABC Challenge blog. Their theme this week was N is for Neutrals, it also worked for last weeks theme N is for Nesties too!

ENJOY!

The Injury!


Thought I would just show you all a picture of hubby's snowmobiling injury that I told you about in my last post. I took the pictures so he could show all his friends on Facebook, so I don't imagine he would mind me sharing them with you. He also has a few small bruises on his arms and other leg but none as pretty as this one!

Monday, February 7, 2011

Snowmobile Thanks!


I made this card for a friend of ours who worked for three nights with my husband on his snow-machine to get it ready for my husband's trip this weekend. My husband and his hockey team headed to the states for a weekend on snowmobiling and good old guy bonding. Unfortunately my husband has an older machine and it needed a bit of work to fix it up before heading out. A good friend of ours worked very hard with husband for three night to get it ready, with great sadness on the day they were leaving and loading the machine it decided not to run. Luckily my wonderful father lent my husband his brand new machine so that he could still go with the boys. I am so glad because I don't think I could have lived with him this weekend moping around like a small child. I am glad to say my husband came back in one piece, but with a very large bruise taking up his whole leg after a run in with a tree. The new machine not so much! A new windsheild and some side mirrors and it will be as good as new. I guess it could have been much worse!

Now on with the card. It has been so long since I have gotten to play along with a challenge, I was so glad to see the Sketch at The Sweet Stop, it was perfect for this card. When I saw this stamp on my friend  Donna's card I knew that it would be the perfect stamp for my Thank You card. The base of the card is made from Stampin' Up's Going Grey cardstock. The pattern paper is from an old Doodlebug winter line. I stamped the Snowmobile Mice from Kraftin' Kimmie with Momento Ink onto some Bella White cardstock. I then coloured them in with my copic markers. I then used the Oval Nestability to cut them out and i also used it to emboss the edge. With it still in the Nestability I used some Going Grey ink to ink around the outside, leaving a white border around the edge. The Thanks is from the stamp set "Say it with Style" from CTMH, I stamped it with Ballet Blue ink from Stampin' Up. I punched it out with the word window punch from Stampin' Up. I mounted it on a pice of Going Grey cardstock punched out with the Modern Label punch from Stampin' Up. I didn't have any ribbon that quite matched the card so I took some plain white ribbon and coloured it with my N3 Copic Marker. I finished off the card with 3 Grey Doodlebug Velvet Brads.

Copic Markers: N2, N5, N7, C5, B12, B16, B45, Y13

ENJOY!

Sunday, February 6, 2011

February Stamping Six Group Card


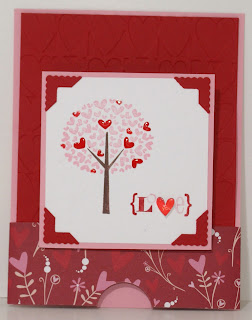
I created this card for my Stamping Six Group gathering in February. I used the fabulous instructions from Splitcoaststampers to create this Sliding Pop-Up card. I like to try and teach a new technique or a new card style at my Stamping Six Gatherings. I used the new stamp set "Love Defined" from Stampin' Up. To make the tree different colours I first inked up my stamp with Pretty in Pink ink then coloured in the trunk of the tree with Chocolate Chip marker and a few of the hearts with a Real Red marker. Because the marker colours are so much darker then the ink on the stamp you can colour right over top with out change the colour or ruining the marker. I gave the stamp a bit of a "huff" then stamped it onto the Whisper White cardstock. I matted the image with Pretty in Pink cardstock and added 4 corners using the EK Success photo corner punch and some Real Red cardstock. The background of the card is made using Real Red cardstock and the "Many Hearts" embossing folder with the cuttlebug. The pattern paper is from a old Heidi Grace line, sorry I can't remember the name of it.


When you slide the pattern paper piece back the card stands on it's own like the photo above.


When closed the card lays flat and looks like the photo above.

Here is a link to take you right to the fabulous instructions on how to make this card.

ENJOY!!