Tuesday, August 30, 2011

Happy Birthday Lyle!


I made this card for my Father-In-Laws birthday today. I wanted to make a card with a trailer on it as we have been doing some camping with them lately out at their trailer. I used a lot of masking so that I was able to colour the images with my copics and create the background.

Here's what I used:

All items are Stampin' Up unless otherwise specified

Cardstock: Early Espresso, Whisper White

Pattern Paper: Reminisce The Great Outdoors Line

Ink: Momento Black, Old Olive, Marina Mist, Pacific Point, Not Quite Navy, Soft Suede, Early Espresso

Markers: Chocolate Chip

Stamps: Happy Camper, Under the Stars, Loads of Fun, Create a Cupcake, Occasional Quotes

Tools: Nestability Scalloped Square, Sewing Machine, EK Success Dotted Wave Edge Punch

Copic Markers: E19, E74, B93, Y17, R29, T1, T3, T7, N3

Accessories: Smooch Spritz Gold Glow, Smooch Illuminate Top Coat

ENJOY!!!


Monday, August 29, 2011


Wow time is sure flying by fast. The kids have been keeping me busy! We also bought a trailer and have been trying to use it us much as we can before the cold weather hits. I have been making a lot of cards for Charity Stamping Party coming up in September. I will start to post some of them soon.


Here is a comparison shot of both girls at 4 months. I think they are really starting to look a like.

ENJOY!!


Thursday, August 25, 2011

My Advent Calendar


I will first start by saying this Advent Calendar was a lot more work then I first thought it was going to be. It has taken me almost 2 weeks to finish it. However, I am so happy with how it turned out! It didn't come out how I first thought it was going to, but I do think it came out better then I had imagined. 

I picked up the kit about two years ago at my local scrapbooking store DAT'S. I first started by sanding all the pieces with a electric palm sander. I really reccomened using one if you decide to take on this project, it really speed up the sanding time.  I tehn painted all the pieces with Red Paint. It took about three coats to really cover the boards. I then painted 1/3 of the numbers with Red, 1/3 of the numbers with Light Green and 1/3 with Dark Green Paint. When the paint was dried I sprayed them all with a bit of Tattered Angles Glimmer mist. I then finished them of by coating them with two layers of clear embossing powder on the top to give them a glossy look. 


The page in the centre is made using Bo Bunny new line of Double Dot papers. The Ribbon is from Stampin' Up and finished off with a button from my stash. I used the ornament punch from Stampin' Up to punch out some the Ornaments from matching paper. I then used foam squares to adhere them. I stitched above them with some sparkly white embroidery floss. The photo is actually removable. I made it so that every year I could replace it with that years Santa Picture. I thought this would be a great way to display the girls' Santa picture. 


The boxes are covered with 5 different Christmas papers from various designers. I used various embellishments from my stash to make each box look a little different. 


In the end I love how it turned out and I am glad that it is finish. Now I can't wait for Christmas so that I can use it.

ENJOY!

Monday, August 15, 2011

"Winter Reflections" Card Class


"Winter Reflection" Card Class

Date: Thursday October 27, 2011

Location: DAT'S Scrapbooking

Time: 7:00pm - 10:00pm

Cost: $7

At this class we will be using the reflection technique and a brayering technique to create this wintery scene. To register for this class please contact Donna at DAT'S Scrapbooking. Registration begins August 16, 2011.

Sunday, August 14, 2011

"Fall Fun" Layout Class


"Fall Fun" Layout Class

Date: Thursday October 13, 2011

Location: DAT'S Scrapbooking

Time: 7:00pm - 9:00pm

Cost: $20

Photos Needed: 1 - 6x8 Horizontal, 4 - 3 1/2 x 5 Vertical

At this class we will be making a two page layout using Reminisce's new fall line. We will also be learning how to make our own buttons from Fimo baking clay to use on our page. To register for this class please contact Donna at DAT'S Scrapbooking. Registration begins August 16, 2011.

Saturday, August 13, 2011

"Purplelicious Birthday" Card Class


"Purplelicious Birthday" Card Class

Date: Saturday October 15, 2011

Location: DAT'S Scrapbooking

Time: 1:00pm - 3:00pm

Cost: $7

At this class we will be making a beautiful birthday card using Stampin' Up's new Delicate Dollies paper and stamps. The flower on the front of the card is made to come off and be worn as a pin. In this class we will be learning embossing and the Joy Fold card Technique. To register for this class please contact Donna at DAT'S Scrapbooking. Registration begins August 16, 2011.


Friday, August 12, 2011

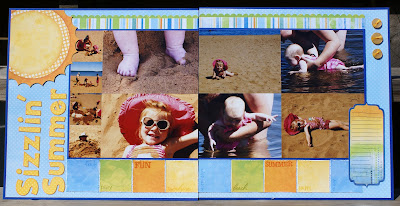
"Sizzlin' Summer" Layout Class


"Sizzlin' Summer" Layout Class

Date: Thursday September 29, 2011

Location: DAT'S Scrapbooking

Time: 7:00pm - 9:00pm

Cost: $20

Photos Needed: 2 - 4x6 Horizontal, 4 - 4 x 5 1/4 Horizontal, 4 - 2x2

At this class we will be making a two page layout using Bo Bunny's new summer line "Barefoot Bliss". We will also be distressing and stamping to create this fun layout. To register for this class please contact Donna at DAT'S Scrapbooking. Registration begins August 16, 2011.


Saturday, August 6, 2011

Launch Party Card


Here is the card that we made at my Launch Party for Stampin' Up's new 2011-2012 catalogue. I think the party was a great success for my first one. Some lessons learned for next year.

Products Used

All items are Stampin' Up unless otherwise specified

Cardstock: Lucky Limeade, Island Indigo, Pool Party, Whisper White

Ink: Lucky Limeade, Island Indigo, Pool Party, Whisper White

Markers: Island Indigo, Lucky Limeade

Stamps: Pennant Parade

Tools: Pennant Builder Punch, 5/8 Circle Punch, Perfect Polka Dots Embossing Folder, Colour Spritzer 

Cricut Cartridge: Mini Monogram

Accessories: Whisper White Baker's Twine, 3D Foam Squares