For Christmas my wonderful husband bought me a iPad. Now I am trying to make a blog post from my iPad. Hope everyone had a wonderful Christmas and hope you have a safe and Happy New Year.
Friday, December 30, 2011
Thursday, December 29, 2011
Scratch and Sniff Birthday Card Class
Scratch and Sniff Birthday Card Class
Date: Thursday February 2, 2012
Time: 7:00pm
Cost: $7.00
An A-maz-ing Card Class
An A-maz-ing Card Class
We will be using some of Stampin' Up's new products to make this cute Valentine's Day card. We will be using paper from the Sell-a-bration catalogue. You are able to get this paper pack for FREE with a $60 purchase of Stampin' Up products during Sell-a-bration.
Date: Thursday January 19, 2012
Time: 7:00pm
Location: DAT'S Scrapbooking
Cost: $7.00
Noel Two Page Layout Class
Noel Two Page Layout Class
We will be using Little Yellow Bicycle Christmas Line to create a two page layout with a magical feeling. The page even has a secret folder to hide a Christmas letter, some personal thoughts or even a few more photos.
Date: Thursday January 26, 2012
Time: 7:00pm
Cost: $20.00
Wednesday, December 28, 2011
Sorry .....
Hello to all of my class searchers. I had prepared my class posts to automatcally post just before Christmas. Now that the Christmas rush ended I was surprised to find that none of my posts had gone up. I do apologize to everyone who has visited looking for them. I will post them as soon as I am done this post.
Wednesday, December 21, 2011
A Year in Review Two Page Layout Class
A Year in Review Two Page Layout Class
Recap 2011 with this fun layout using Simple Stories Year -o-graphy paper line. At this class I will show you how to dress up a page with some simple cutting.
Date: Thursday February 16, 2012
Time: 7:00pm
Cost: $20.00
Friday, October 21, 2011
Fall Splendor Card
This is another card for one of my Stamping Six Groups. I really wanted to use the new Spice Cake Designer Series Paper from Stampin' Up. Sorry the photo isn't the best, I took it early this morning before the sun was up.
Products Used:
Stamps: Gently Falling, Tiny Tags
Pattern Paper: Spice Cake Designer Series Paper
Cardstock: PoolParty, Early Espresso
Ink: Soft Suede, More Mustard
Accessories: Crumb Cake Seam Binding, Small Jewellery Tag Punch, Early Espresso Baker's Twine
Tools: Square Lattice Embossing Folder, Top Note Die Cut
Thursday, October 20, 2011
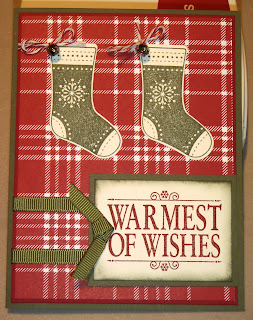
Another Warm Wishes Card
Another creation fro my Stamping Six Group. This time I used a different pattern paper from the Frostwood Lodge Line and Garden Green instead of Always Artichoke.
Products Used:
Stamps: Stitched Stockings, Warmest of Wishes Hostess Set
Pattern Paper: Frostwood Lodge Designer Series Paper
Cardstock: Cherry Cobbler, Very Vanilla, Garden Green
Ink: Cherry Cobbler, Garden Green
Accessories: Cherry Cobbler 3/8" Quilted Satin Ribbon, Mini Jingle Bells, Cherry Cobbler Baker's Twine
Tools: Stocking Builder Punch
Tuesday, October 18, 2011
New Uptown Girls Birthday Card
This is the card that I made for my girlfriend Donna. I couldn't wait to use on of my new stamps that I had bought from Stamping Bella's most recent release from my LSS.
Products Used:
Stamps: Uptown Girls Clarissa and Camille with a cafe
Pattern Paper: Spice Cake Designer Series Paper
Cardstock: Early Espresso, More Mustard, Very Vanilla, Express White
Ink: Momento Black, Early Espresso
Accessories: Certainly Celery 1/8" Taffetta Ribbon, In Colour Designer Print Brads
Tools: Copic Markers
Wednesday, October 5, 2011
Wamest Wishes Card
Here is the card that we are making with my Stamping Six group this month. I really love how this card turned out. I always have to laugh at how the idea that I start with never seems to happen but how I am always happier with how things turn out.
Products Used:
Stamps: Stitched Stockings, Warmest of Wishes Hostess Set
Pattern Paper: Frostwood Lodge Designer Series Paper
Cardstock: Cherry Cobbler, Very Vanilla, Always Artichoke
Ink: Cherry Cobbler, Alwys Artichoke
Accessories: Always Artichoke 1/4" Grosgrain Ribbon, Mini Jingle Bells, Cherry Cobbler Baker's Twine
Tools: Stocking Builder Punch
Monday, October 3, 2011
Here is a Christmas card I made using the Pennant Punch set. This was another sample card I had made for the Charity Stamping Party.
Products Used:
Stamps: Pennant Parade
Pattern Paper: Pear Pizzaz DS Paper
Cardstock: Real Red, Whisper White, Pear Pizzaz
Ink: Real Red, Pear Pizzaz
Accessories: Pear Pizzaz Brad, Real Red Taffeta Ribbon
Tools: Jewellery Tag Punch, Scalloped Ribbon Punch, i-Rock tool and gems
Wednesday, September 28, 2011
Here is one of the cards I made for my samples at the Charity Stamping Party. I am thinking of making a few more of these maybe in a couple of different colours. The set is one of the Sell-a-bration set from this past year. I saw a card similar to this on a blog but unfortunately I can't remember which one to give them credit.
Product used:
Cardstock: More Mustard, Chocolate Chip, Whisper White
Pattern Paper: Stella Rose 6x6 paper pack
Ink: More Mustard, Chocolate Chip
Stamp Set:
Tools & Accessories: SU! scalloped border punch, i-Rock tool and gem
Friday, September 9, 2011
Charity Stamping Party
I made this card for our up coming charity stamping party this weekend. I have listed all the details about the party below. If you are interested in making this card come out and join us for a great time!
Charity Pajama Stamping Party
& Yard Sale with a Twist
All proceeds are going to the Northern Cancer Fund –
Chemotherapy in Memory of Ellena Esteves.
You must RSVP by Wednesday, September 07, 2011 by 5:00 p.m. in order to attend.
Sunday, September 11, 2011
1:00 – 4:00 p.m.
Cost: FREE
You will make one Christmas Card with Stampin’ Up (See Image Above) and one Christmas Card with Close to My Heart (See Shanna's Post here). We will have lots of samples up to get your wheels a turning for your own projects, juice and some snacks.
If you want to put an order in with either company that day, you are more than welcome to. If you place a $100.00 order with Stampin’ Up (before shipping & taxes), you will receive FREE SHIPPING. If you place a $100.00 order with Close to My Heart (before shipping & taxes), you will receive FREE SHIPPING.
For every $50.00 you spend that day with either company, you will receive a ballot for a prize package that we will be raffling off that day.
All the Hostess Rewards from each company are used to purchase products for the next year’s Yard Sale with a Twist. All the money raised from our Yard Sale with a Twist will be going to the Northern Cancer Fund – Chemotherapy in Memory of Ellena Esteves.
After everyone has made their card, we will begin the Yard Sale with a Twist. We take all the products that we collected over the year and package them together and sell them off. To find out about the “Twist” part, please give us a call at 344-7702.
For the Yard Sale portion of the day, we ask that you bring cash. We will accept a cheque, but that just causes more work for me, so I would prefer cash.
For Close to My Heart, you can only pay with cash or cheque. For Stampin’ Up orders, you can pay with cash, cheque, Visa or MasterCard.
Tuesday, August 30, 2011
Happy Birthday Lyle!
I made this card for my Father-In-Laws birthday today. I wanted to make a card with a trailer on it as we have been doing some camping with them lately out at their trailer. I used a lot of masking so that I was able to colour the images with my copics and create the background.
Here's what I used:
All items are Stampin' Up unless otherwise specified
Cardstock: Early Espresso, Whisper White
Pattern Paper: Reminisce The Great Outdoors Line
Ink: Momento Black, Old Olive, Marina Mist, Pacific Point, Not Quite Navy, Soft Suede, Early Espresso
Markers: Chocolate Chip
Stamps: Happy Camper, Under the Stars, Loads of Fun, Create a Cupcake, Occasional Quotes
Tools: Nestability Scalloped Square, Sewing Machine, EK Success Dotted Wave Edge Punch
Copic Markers: E19, E74, B93, Y17, R29, T1, T3, T7, N3
Accessories: Smooch Spritz Gold Glow, Smooch Illuminate Top Coat
ENJOY!!!
Monday, August 29, 2011
Wow time is sure flying by fast. The kids have been keeping me busy! We also bought a trailer and have been trying to use it us much as we can before the cold weather hits. I have been making a lot of cards for Charity Stamping Party coming up in September. I will start to post some of them soon.
Here is a comparison shot of both girls at 4 months. I think they are really starting to look a like.
ENJOY!!
Thursday, August 25, 2011
My Advent Calendar
I will first start by saying this Advent Calendar was a lot more work then I first thought it was going to be. It has taken me almost 2 weeks to finish it. However, I am so happy with how it turned out! It didn't come out how I first thought it was going to, but I do think it came out better then I had imagined.
I picked up the kit about two years ago at my local scrapbooking store DAT'S. I first started by sanding all the pieces with a electric palm sander. I really reccomened using one if you decide to take on this project, it really speed up the sanding time. I tehn painted all the pieces with Red Paint. It took about three coats to really cover the boards. I then painted 1/3 of the numbers with Red, 1/3 of the numbers with Light Green and 1/3 with Dark Green Paint. When the paint was dried I sprayed them all with a bit of Tattered Angles Glimmer mist. I then finished them of by coating them with two layers of clear embossing powder on the top to give them a glossy look.
The page in the centre is made using Bo Bunny new line of Double Dot papers. The Ribbon is from Stampin' Up and finished off with a button from my stash. I used the ornament punch from Stampin' Up to punch out some the Ornaments from matching paper. I then used foam squares to adhere them. I stitched above them with some sparkly white embroidery floss. The photo is actually removable. I made it so that every year I could replace it with that years Santa Picture. I thought this would be a great way to display the girls' Santa picture.
The boxes are covered with 5 different Christmas papers from various designers. I used various embellishments from my stash to make each box look a little different.
In the end I love how it turned out and I am glad that it is finish. Now I can't wait for Christmas so that I can use it.
ENJOY!
Monday, August 15, 2011
"Winter Reflections" Card Class
"Winter Reflection" Card Class
Date: Thursday October 27, 2011
Location: DAT'S Scrapbooking
Time: 7:00pm - 10:00pm
Cost: $7
At this class we will be using the reflection technique and a brayering technique to create this wintery scene. To register for this class please contact Donna at DAT'S Scrapbooking. Registration begins August 16, 2011.
Sunday, August 14, 2011
"Fall Fun" Layout Class
"Fall Fun" Layout Class
Date: Thursday October 13, 2011
Location: DAT'S Scrapbooking
Time: 7:00pm - 9:00pm
Cost: $20
Photos Needed: 1 - 6x8 Horizontal, 4 - 3 1/2 x 5 Vertical
At this class we will be making a two page layout using Reminisce's new fall line. We will also be learning how to make our own buttons from Fimo baking clay to use on our page. To register for this class please contact Donna at DAT'S Scrapbooking. Registration begins August 16, 2011.
Saturday, August 13, 2011
"Purplelicious Birthday" Card Class
"Purplelicious Birthday" Card Class
Date: Saturday October 15, 2011
Location: DAT'S Scrapbooking
Time: 1:00pm - 3:00pm
Cost: $7
At this class we will be making a beautiful birthday card using Stampin' Up's new Delicate Dollies paper and stamps. The flower on the front of the card is made to come off and be worn as a pin. In this class we will be learning embossing and the Joy Fold card Technique. To register for this class please contact Donna at DAT'S Scrapbooking. Registration begins August 16, 2011.
Friday, August 12, 2011
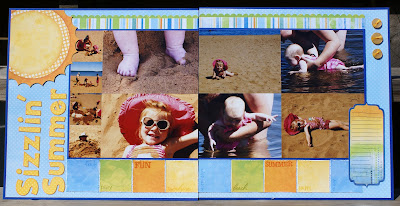
"Sizzlin' Summer" Layout Class
"Sizzlin' Summer" Layout Class
Date: Thursday September 29, 2011
Location: DAT'S Scrapbooking
Time: 7:00pm - 9:00pm
Cost: $20
Photos Needed: 2 - 4x6 Horizontal, 4 - 4 x 5 1/4 Horizontal, 4 - 2x2
At this class we will be making a two page layout using Bo Bunny's new summer line "Barefoot Bliss". We will also be distressing and stamping to create this fun layout. To register for this class please contact Donna at DAT'S Scrapbooking. Registration begins August 16, 2011.
Saturday, August 6, 2011
Launch Party Card
Here is the card that we made at my Launch Party for Stampin' Up's new 2011-2012 catalogue. I think the party was a great success for my first one. Some lessons learned for next year.
Products Used:
All items are Stampin' Up unless otherwise specified
Cardstock: Lucky Limeade, Island Indigo, Pool Party, Whisper White
Ink: Lucky Limeade, Island Indigo, Pool Party, Whisper White
Markers: Island Indigo, Lucky Limeade
Stamps: Pennant Parade
Tools: Pennant Builder Punch, 5/8 Circle Punch, Perfect Polka Dots Embossing Folder, Colour Spritzer
Cricut Cartridge: Mini Monogram
Accessories: Whisper White Baker's Twine, 3D Foam Squares
Thursday, July 21, 2011
Rhylan is 3 Months!
Rhylan is 3 months old. She is getting big fast but not fast enough for the doctor. She hasn't gained any weight in over a month so we are moving her onto formula. Hopefully this will fix the problem and help put on some weight. I hope to have some cards to post soon. Have been so busy getting classes ready for the fall I haven't had much to post lately. I hope to be able to work on some sample cards really soon!
Monday, July 11, 2011
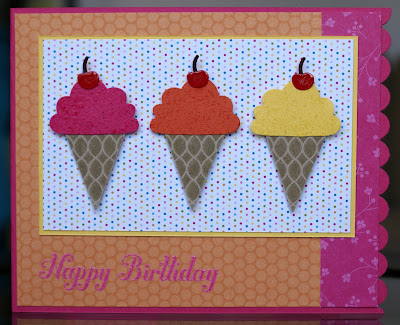
Ice Cream Birthday!
I made this card for the new Stampin' Up Catalogue Launch Party that I am having this Thursday. I wanted to show how many different ways you could use the new Pennant Parade stamp set and matching punch. I have made quite a few different cards using the stamp set, I will post more of them after the launch party as I want to keep some of them a surprise for the guests.
Pattern Paper - SU Sellabration Paper Pack
Cardstock - Melon Mambo, Daffodil Delight, Crumb Cake, Real Red
Ink - Versamark, Crumb Cake, Melon Mambo
Marker - Chocolate Chip, Melon Mambo, Daffodil Delight
Stamps - SU "Pennant Parade", SU "Bring on the Cake", SU "Teeny Tiny Wishes"
Punches - SU Pennant Punch, SU Create a Cupcake punch, SU Scalloped Border punch, SU Eyelet Border punch
Embellishments - Goosebumps Spray, Glossy Accents, SU Melon Mambo embossing powder
Tools - SU Color Spritzer
ENJOY!!
Saturday, July 9, 2011
Welcome Jocelyn!!
Friends of ours delivered their baby girl Jocelyn this morning. We went by for a visit this evening so I made them a card this afternoon. I have been playing around with my new stamp set "Pennant Parade" from Stampin' Up. So far this is the only stamp set from the new catalogue that I have, my big order of new stamps is due to arrive next week. I can't wait!!
To make this card I used:
Cardstock - Early Espresso, Blushing Bride, Crumb Cake & Very Vanilla
Ink - Early Espresso, Blushing Bride & Crumb Cake
Marker - Early Espresso
Stamps - SU "Pennant Parade", SU "Itty Bitty Bits", CTMH "Doodle Alphabet", Stampendous "Baby Love"
Punches - SU Pennant Punch, SU Jewellery Punch
Ribbon - SU Early Espresso & White Bakers Twine & Chocolate Chip Dotted Scalloped Ribbon
Embellishments - Brown Glitter Brad, Crystal Gem Brad, Brown Pearls
Tools - SU Perfect Polka Dots Embossing Folder
ENJOY!!
Friday, July 8, 2011
Happy Birthday Jack!
I made this card for my cousin Jack's Birthday. I wanted to use the new Pennant Parade stamp set from Stampin' Up. I decided to turn them upside sown to make them look like party hats. The card sketch came from Taylored Expression Sketch Challenge #142. To make the card I started with a base of Early Espresso cardstock. I then added some Crumb Cake cardstock for a mat for my pattern paper. The pattern paper is from my Basic Grey 6x6 Birthday Pack. I then stamped three party hats in Wild Wasabi, Marina Mist, and Tangerine Tango on the matching Cardstock. I then punched them out with the new Pennant Punch from Stampin' Up. The larger hat is cut from some more paper from the 6x6 Basic Grey paper pack. I placed the hats on a strip of Crumb Cake cardstock that I spritz with my Stampin' Up Colour spritzer and the Crumb Cake marker. The pom poms on the hats are flower brads that I had in my stash. I mounted the Crumb Cake strip on top of some Early Espresso cardstock that I punched on one side with the Scalloped Edge Punch from Stampin' Up. The sentiment is from the Stampin' Up Sell-a-bration set "So Happy For You". I stamped it on some Crumb Cake cardstock with Early Espresso ink. I then notched out the end and curled it slightly to look like a banner. I finished the card off with some Brown pearls from my stash.
On the inside of the card I used some more Crumb Cake cardstock. My sentiments are from the Stampin' Up set "Bring on the Cake". I drew around the outside with the Early Espresso marker to make a small border. My friend Donna does this on the inside of her cards and I think it looks great so I thought I would give it a try.
I entered my card in the Taylor Expressions Sketch Challenge #142 at Splitcoaststampers.
ENJOY!!
Monday, June 27, 2011
Happy Birthday Kyle!
I made this card for my husband for his birthday. We celebrated his birthday yesterday with a nice backyard BBQ with some of our friends. For his birthday I gave my husband a gift certificate to get his tattoos done. After Rhylan was born my husband new he was ready to get the girls names done. He plans to get one on each forearm. He was very excited about his gift!
To make the card I started with some crumb cake cardstock for the base of the card. I then used some of my Stella Rose paper for the two pattern papers in the background. I matted one of the pattern papers with some Very Vanilla and Baja Breeze. I stitched around the outside with my sewing machine and some dark brown thread. I then stamped out Beerafella with some memento ink on some Very Vanilla cardstock. I then cut it out using my oval nestabilities. I used a technique my friend Shanna taught me to make sure I didn't cut off the beer case with the nestability. I added a scalloped oval cut from some crumb cake cardstock using the scalloped oval nestabilities. I coloured Beerafella with my copic markers and distressed the edges with some crumb cake ink. I added some of my new Early Espresso Scalloped ribbon from Stampin' Up to the left side and placed my image over top. The sentiment is from a 2011 Stampin' Up Sell-a-bration set called"Happy for You". I stamped it with Early Espresso Ink and distressed the edges again with Crumb Cake ink. I added a Baja Breeze corduroy button with some Whisper white and Early Espresso bake's twine.
On the inside of the card I used some scraps from my Stella Rose paper to finish off the card. I used the "Occasional Quotes" and "Bring on the Cake" stamp sets for my sentiment.
ENJOY!
Thursday, June 23, 2011
Rhylan is 2 Months Old!
Wow my baby is now 2 months old, where has the time gone. Rhylan now smiles and is very close to laughing, she is even trying to pull her self up to be sitting when you are holding her. She is getting big so fast, I wish I could slow down time!
Here is a comparison photo of my two girls at the same age. Both of the stuff animals behind the are the same hight and size!
Subscribe to:
Posts (Atom)


.jpg)


