Tuesday, June 25, 2013

Rose's Retirement card


Another retirement card for another retireing co-worker. This one is for my dear friend Rose. This Kraftin' Kimmie stamp reminded me of her. I stamper her on white cardstock and also on some pink pattern paper. I then coloured her with my copic markers. I cut the car from the pin pattern paper and paper pieced her to my image. I then cut my her out and placed her on the blue pattern piece of paper which I then cut with my nestability. For the next layer I cut some Melon Mambo cardstock with another nestability. I printed my sentiment with my computer onto my pattern paper. All the pattern paper is from the same 6x6 paper pad. The ribbon is Rose Red Grossgrain from Stampin' Up. To finish of my card I added three Bella Blings to the left hand corner.

ENJOY!

Sunday, June 23, 2013

Jane's Retirement Card


This is a retirement card I made for one of my co-workers. I used a really old Stampin' Up set "Buzzin' By to say Hi". I stamped the image three time and water coloured each one with Stampin' Up water colour crayons. I then used foam squares to raise each level of the behive. The bees are stamped twice and raised. The wings on the bees are glittered to give them some sparkles. The base of the card is made with chocolate chip. The pattern paper is from Bo Bunny Autumn Splendor line. The ribbon and coduroy brads are from Stampin' Up. I apologize for the awful photo, I was using my cell phone as I forgot to take one before I gave it to her.

ENJOY!

Friday, June 21, 2013

Happy Birthday Collin


Does this card look familar? Our friend's son was having a lego party just after Rhys' party. I decided I loved the lego Thank You cards I made, so I changed the sentiment and made it into a Birthday card.

ENJOY!

Wednesday, June 19, 2013

Thanks a "Block" ...


I made this card to thank some of the people that were a huge help to me at Rhys' Lego Party. The Lego man is created totally from punches. The pattern paper is all left over scraps from making some Thank You cards you will see in a upcoming post. The Thanks speech bubble is from a CTMH set and stamped in Real Red. The base of the card is made from Real Red cardstock and a mat of Daffodil Delight. I recreated this card 5 times. Sorry for the bad lighting I took the photo in the late evening as the sun was setting.

ENJOY!

Monday, June 17, 2013

The LEGO Party


After weeks of planning and preparing the Lego Party came and went. It was a great time and everything ran really well. I wanted to show you a few pictures of some of the items I prepared for the party.

These are the loop bags I made. I bought the bags from Michael's and boughts matching cardstock for the circles. The circles are cut with a circle punch and then raised up with a foam square. In the loop bags were a colouring book, some lego man and lego block crayons, candy lego blocks, a glow bracelet and a man and car for them to build.


A close up of the bag.


This is my youngest rockin' it out on the Kareoke Machine.


This was the pin the head on the lego man game I made. Each kid got a lego head and got to draw their own lego face on it. They then each took a turn tyring to put the head on the body while being blind folded.

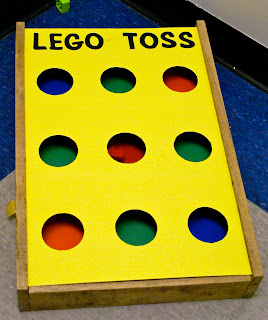
I made a lego toss game from a old bean bag toss game I found at work. The kids all loved trying to see how many blocks they could get in. 

I borrowed some legos from a friend at work. Her son has been collecting them for many years so his collection was quite a bit larger then ours. I had it all spread out on a table for the kids to build with. The boys really loved it and spent most of the time there.


Our friend's son created a really cool lego plane.


Rhys received MANY lego set for her birthday. Behind her is one of the banners I made a long with some help from my dear co-workers Emily and Nikki. They helped me to put on all the circles with foam squares.


I made these lego head treats from marshmellows and melted yellow chocolate. I then drew faces on them with melted chocolate chips and a zip lock bag with the corner cut off. I unfourtunately didn't get a picture before Rhys began to gobble it up. There was also a mini yellow M&M on the top to look like the little button on their heads.


 Rhys enjoying her Lego Treat.


Here is the large Lego Banner I made. I used the same items and method as the first banner and the Lego and loop bags.


ENJOY!!

Saturday, June 15, 2013

No Bones about it...


My friend Donna had used this stamp on a Birthday Card she made awhile ago. As soon as I saw it I knew I need to use it for a Retirement card for my Co-Worker John. I work in a x-ray department so the Skeleton is very fitting, as well as the sentiment "No Bones about it". The stamp comes from CTMH and I stamped him on Whisper White cardstock. The pattern paper is from the Neutrals Designer Series Paper pack from Stampin' Up.

I stamped the skeleton in Basic Black ink on Whisper White cardstock and matted with Basic Black cardstock. I then sewed around the edge with some white thread and my sewing machine. I stamped the Basic Balck Ink on some Smoky Slate cardstock. I then printed "You'll be missed" on Smoky Slate with my computer and printer. I finished off the card with some grey buttons from CTMH. The ribbon is from my stash of Bo Bunny Double Dot Ribbon.

ENJOY!!

Thursday, June 13, 2013

Rhys' Lego Digital Invitation


I made Rhys invite this year using My Design Studio from Stampin' Up. I also purchase a digital Lego pack from a online company. Unfortunately there was no Lego Figure with the package and I couldn't find one online. So I decided to make my own. The Lego Girl was made using punches from the My Digital Studio. I LOVE how she turned out! I also made the number 5 out of Lego block pictures that were in the kit I bought. When I was done I save the file as a jpg and took the it to Shoppers Drug Store and had them printed as a 4x6 photo. Make the creation took time but it was a lot faster then hand making them all. I then took the same file and changed the information to make invites for our family Birthday Party.

Tuesday, June 11, 2013

Meg's Recipe box


I made this recipe box for a Co-Worker's daughter, the same one that I made the Shower Invites for in the previous post. With the Shower invitation they sent recipe cards for the guests to fill out with their favorite recipe. The box is made to match the invitation.

I used the same jar stamp and flowers on the invite as the box. The pattern paper is from a old Stampin' Up Christmas line. I cut the Title using my Gypsy and Cricut in the same patter paper as I used on the lid of the Box. I used the Stampin' Up 7/16 Natural Trim ribbon to go around the edge of the lid and on the clipboard.

The clipboard is made with the same patter paper as the outside of the box. I used Soft Suede to mat the pattern paper before placing it on the clipboard. The "Bon Appetit" is from a old Stampin' Up set and is stamped using Soft Suede ink. The Salt and Pepper shakers are from a old Stampendous stamp set, they are also stamped in Soft Seude Ink. I used the same ribbon as on the lid of the box.

ENJOY!

Sunday, June 9, 2013

Happy 30th Birthday!!


Our friend Katie Celebrated her 30th Birthday last month. I decided to make another Easle Card like the 60th Birthday Card I made a little while ago. The 30 was cut using my Gypsy and Cricut. The card base is made from Sage Shadow cardstock and the mats are made using Crumb Cake cardstock. The pattern paper on the backrgound is from one of my 6x6 paper packs from my stash.

The pattern paper on the 30 is from Bo Bunny and I used some Vintage Photo Ink from Tim Holtz to ditress the paper and tone down the pink a little. The ribbon is from my stash of Bo Bunny Double Dot Ribbon. The postage stamp is made using the postage punch from Stampin' Up.

The Sentiment is from Stampin' Up's "Bring on the Cake" and it is stamped with Basic Black Ink. I punches the edge of the pattern paper with the discontinued Notebook Edge punch from Stampin' Up.

ENJOY!

Friday, June 7, 2013

A Whirly Birthday!


My little cousin's baby turned 1 last weekend. I love how the card turned out and I am planning on making a few more for my stash. The Pinwheel stamp set is from CTMH and I stamped the different layer using Pumpking Pie, Tempting Turquoise, Lucky Limeade Ink and Pacific Point Ink. The layers were all cut on my cricut using the CTMH Philosphy Cartridge. The pattern paper is from one of my 6x6 paper packs. I sewed around the edge of the paper with some white thread and a zig zag stitch on my sewing machine. The sentiment is from the new Stampin' Up hostess set "Banner Greetings" and is stamped in Tempting Turquoise. I used a Glitter Brad and some Lucky Limeade Baker's Twine to finish it off.


The inside of the card is made with Whisper White cardstock. I drew a line around the outside with a Tempting Turquoise marker. The sentiment is from Stampin' Up's "Bring on the Cake" Stamp Set. The stars are from CTMH Pinwheel set and are stamped using Pumpkin Pie, Lucky Limeade, and Tempting Turquoise Ink.

ENJOY!

Wednesday, June 5, 2013

Happy Birthday Morgan!


Rhys' best friend had her 5th Birthday last weekend. Her and Rhys are born 10 days apart and are inseperable! This is the card I came up with for her Birthday. I wanted to try out the new Designer Series pattern paper "Quatrefancy" from Stampin' Up. The stamp is one of my many Lulu stamps from Kraftin' Kimmie. The sentiment "Hoopy Birthday" came with the stamp and I stamped it using Island Indigo ink. I stamped her on Whisper White cardstock and coloured her with my copics. The bow is Daffodil Delight 3/8 Taffeta Ribbon from Stampin' Up. The pompom ribbon is a discontinued item from Stampin' Up. I sewed around the edge of the card with my sewing machine and some white thread.


The inside of the card is made with Whisper White cardstock. I drew a line wround the card with Island Indigo marker. The Cupcake in the corner is from a retired Hostess set from Stampin' Up. The sentiments are also from Stampin' Up and are stamped using the new Strawberry Slush Ink.

Enjoy!

Monday, June 3, 2013

Bike Diaper Cake


While on a baby theme. I thoughts I would share the Motorcycle Diaper Cake I made for a friend having a Baby Girl. My mom and me watched several You Tube Videos and then decided to try tackling it ourselves. I love how it turned out!! The whole thing is made from 33 size 1 diapers, 2 bibs, 4 receiving blankets, 1 bottle, and a pair of socks. I plan to try this again for another special baby that is on the way but maybe this time I will try making a three wheeler!


ENJOY!