Wednesday, November 20, 2013

Poinnsetta in White


Here is another card made with the Joyful Wishes Poinsetta. I saw the idea for this card online. I loved how it looked and the technique she used  (sorry I can't remember the site), so I decided to use it for my Stamping Six groups this month.


To make this card I started by stamping the poinsettia onto some Whisper White Paper with Versamark and then embossed it using some white embossing powder. I repeated this for all the flower on the page. I started with a base of Blush Bride on and around the Poinsettias. I then added in some Cherry Cobbler with a foam dauber just on the flower. I then hand painted the flower using my Cherry Cobbler ink pad and my Aqua painter brush. I finished the flower with some white Liquid Pearls in the centre.

I stamped the sentiment from the Joyful Wishes stamp set with Basic Black. I also drew a line around the outside with the Basic Black marker. I then tied some Cherry Cobbler and Whisper White Baker's Twine around the card and finished it off with a bow. I matted the sheet with a thin mat of Whisper White and attached it to the Cherry Cobbler card base.  


Stampin' Up Items Used:
Joyful Wishes Stamp Set (131805) pg.27 Holiday Mini
Cherry Cobbler Card Stock (119685) pg.149
Cherry Cobbler Ink (126966) pg.149
Blushing Bride Ink (131172) pg. 147
Basic Black Ink (126980) pg.145
Basic Black Marker (100082) pg.145
Cherry Cobbler Bakers Twine (123125) pg.173
Versamark Ink (102283) pg.165
Heat Gun (129053) pg.167
White Embossing Powder (109132) pg.167

ENJOY!!


Tuesday, November 19, 2013

Joyful Wishes in Gold...


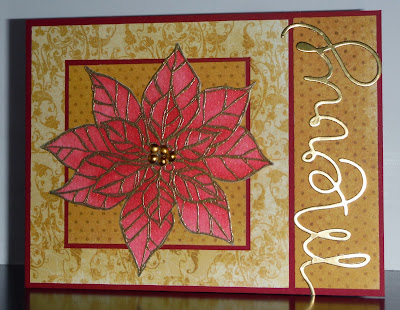
This card I made using the poinsettia from the "Joyful Christmas" Stamp Set in the new Holiday Mini. I had a hard time photographing this card as the gold paper really liked to reflect my flash. Out of about 20 pictures this was the best one, unfortunately it really doesn't make the flower look as Red as it is in real life.

To make this card I started by stamping the poinsettia onto some Watercolour Paper with Versamark and then embossed it using some gold embossing powder. I then hand painted the flower using my Cherry Cobbler ink pad and my Aqua painter brush.  I cut the flower out by hand and mounted it to a square of pattern paper. All of the pattern paper is from the new Bo Bunny Christmas line "Silver and Gold". To finish off the poinsettia I added 5 gold brads in the middle using my iRock tool.

I then used the new Expression Thinlit dies and the Gold Foil paper from the Holiday Mini to create the  word Merry. I mounted the word to a strip of the same pattern paper I placed behind the poinsettia. I was able to created 10 of these cards for my Christmas Card Stash.

Stampin' Up Items Used:
Joyful Wishes Stamp Set (131805) pg.27 Holiday Mini
Expressions Thinlits Dies (132171) pg.36 Holiday Mini
Gold Foil Paper (132622) pg.28 Holiday Mini
Cherry Cobbler Card Stock (119685) pg.149
Cherry Cobbler Ink (126966) pg.149
Versamark Ink (102283) pg.165
Heat Gun (129053) pg.167
Gold Embossing Powder (109129) pg.167


ENJOY!!!

Monday, November 18, 2013

The New Deer ...


I love how this card turned out. I plan on remaking it for a masculine birthday card by swapping out the silver embossing powder for Early Espresso. Then I will substitute the pattern papers for some with a hunting theme. Now onto how I made the card...

This card is made using one of the new set from the Stampin' Up Holiday Mini "Remembering Christmas". The base of the card is made from Island Indigo cardstock. I then used a piece of pattern paper from the Winter Frost paper stack. These are great paper packs as they have 48 sheets of paper, 24 of each of two different double sided papers. These are great for making multiples of the same christmas card. 

I then stamped the deer from the "Remembering Christmas" Stamp Set onto another piece of patter paper from the Winter Frost Paper Stack with some Versamark Ink. I then used silver embossing powder and heated it with my heat gun.  I then distressed around the edge of the paper with Island Indigo ink and a sponge. I finished him off with a bow made from the Silver 1/8 ribbon in the Holiday Mini.

The sentiment is from a CTMH stamp set that coordinates with one a their Cricut Cartridges. I stamped it using pool party ink and then stamped the sentiment using Island Indigo.

Items Used:
Remembering Christmas (131763) pg.28 Holiday Mini
Silver 1/8 Ribbon (132137) pg.28 Holiday Mini
Winter Frost DSP Stack (132183) pg.29 Holiday Mini
Island Indigo Card Stock (122923) pg.149
Island Indigo Ink (126986) pg.149
Pool Party Ink (126982) pg.147
Versamark Ink (102283) pg.165
Heat Gun (129053) pg.167
Silver Embossing Powder (109131) pg.167

ENJOY!!!

Saturday, November 16, 2013

Santa's List ....


Well he is making his list and checking it twice. It is that time of year again, I have been busy working on my Christmas cards. Unfortunately the progress on my new room has not been very speedy so I am still working in a make shift space. It makes scrapbooking a little difficult but I have been making it work.

This card is made using one of the new set from the Stampin' Up Holiday Mini. The base of the card is made from Early Espresso cardstock. I then added a background of Crumb Cake stamped with the Dictionary background stamp. Love this new background stamp, the writing is nice and small so it doesn't draw your eye away from the focus of the card. 

I then stamped my Santa from Santa's List Stamp Set onto Very Vanilla cardstock with Soft Suede ink. I then distressed around him with Crumb Cake ink and a sponge. Then I used a distressing tool to rough up the edges. I then matted it with a piece of Cherry Cobbler. I finished him off with two Cherry Cobbler Candy Dots in the right hand corner.

I stamped the sentiment from the Santa's List stamp set with Soft Suede onto Very Vanilla. I then cut it into a banner and curled the end. I finished it off by stitching a snowflake using some linen thread.

Items Used:
Santa's List Stamp Set (131811) pg.31 Holiday Mini
Dictionary Background Stamp (130348) pg.100
Very Vanilla Card Stock (101650) pg.145
Cherry Cobbler Cardstock (119685) pg.149
Crumb Cake Cardstock (120953) pg.145
Early Espresso Cardstock (119686) pg. 145
Soft Suede Ink (126978) pg.145
Crumb Cake Ink (126975) pg.145
Linen Thread (104199) pg.173
Distress Tool (127562) pg.157
Candy Dots (130932) pg.149

ENJOY!! 

Saturday, July 27, 2013

Construction has begun....

Well I am sad to say I will not be blogging for a bit. The construction has now begun on my new Scrapbook Room. YEAH!!For right now my all of my belongings are in storage so I won't be able to create many projects. We are hoping that the new room will be finished by the Fall so that I can being classes and my Stamping Six groups. I will be sure to post pictures when we are done.

Enjoy!!

Friday, July 12, 2013

Happy Birthday Callen


I made this card for Rhys and Rhylan's friend Callen. I used some of the scraps of pattern paper left over from my last few project. I found this ribbon that matched perfectly in my ribbon stash. The monster stamp is from Stampin' Bella. I stamped it with momento ink and coloured it with my copics. The buttons were two buttons that I found in my stash of buttons. The base of the card is made from Real Red Cardsock and a Daffodil Delight Mat.

ENJOY!!!


Wednesday, July 10, 2013

Baby Alex's Shower Gift

This is the baby shower gift I made for my friend Melissa. The lunchbox right now hold 30 Thank You cards and envelopes, but once those are used up it can hold momento items as Alex gets older.

On the lid I included all of Alex's birth info and a picture I snap of him just a few hours after he was born.

Alex's name was cut using my Gyspy, Circut and the Storybook font.
This is the Thank You cards that are inside of the box. The feet stamp is from Stampin' Up "Baby Prints" stamp set. The Thank You stamp is from a old Stampin' Up set "Many Thanks".

ENJOY!!

Monday, July 8, 2013

Thank You Bus Driver Bob!


I made this card for Rhys' bus driver. I used the same material as Mrs.Gallo's Thank You card but changed the stamps a bit. The bus stamp is also from the CTMH stamp set "School Days". I added two yellow pieces of ribbon with staples to fill in some blank space in the corner.

ENJOY!!

Saturday, July 6, 2013

No More School!


I made these for Rhys to hand out to her class on the last day of school. They made with a package of Lifesavers with a Hershey Kiss glued on the end. I cut a piece of yellow cardstock to fit around the roll. Before I rolled them I used the "I love School" stamp from the CTMH stamp set "School Days". I also  glued my pink strip of paper to my yellow cardstock before I rolled it around the roll. I did have to use some Liquid Glass along the edge to hold the yellow piece around the Livesavers.


I printed out a tag with my computer and the punched it out with a 1 1/4" circle punch. I the clued the tag to a 1 3/8" circle punched from orange cardstock. I tied on the tag with some Orange Ribbon. To finish of the end of the pencil I punched out a 7/8" circle from the same pink cardstock I used before. I heard they were a huge hit with the class.

ENJOY!!


Thursday, July 4, 2013

Thank You Mrs.Gallo!


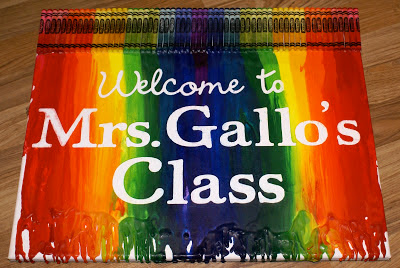
This is the Thank You gift I made for Rhys' teacher Mrs.Gallo. I had been seeing a lot of this art on Pinterest and thought it was perfect for a J.K teacher. I started with a large white canvas I purchased at Micheal's. I then cut my letters out of some Contact Paper, the stuff you line shelves with, using my Gypsy and Cricut. I then used 6 boxes of Crayola Crayons and layed out my rainbow pattern. When I was happy I hot glued them in place.Then came the most time consuming part, melting the crayons. I used a heat gun and very slowly heated my crayons letting them run down the canvas. I worked at it very slowly to get a nice colour pattern to make sure all my letters were well covered. When I was happy I then very lightly heated where the letters were an gently pulled them off. I am very happy with how it turned out and so was Mrs.Gallo. She phoned me at home to personally thank me for the gift. I was very touched!

ENJOY!!

Tuesday, July 2, 2013

Thank You Card for Mrs.Gallo


This is the card I made for Rhys' teacher Mrs.Gallo. I also duplicated the card and made it for Rhys' Crossing Guard as well. The base of the card is Basic Black cardstock with a Real Red cardstock mat. I used some school themed pattern paper from a paper pack someone gave me from Michael's. The School and the children are from a CTMH stamp set "School Days". The ruler is from a old Stampin' Up set. I stamped it with Basic Black ink onto some scrap yellow cardstock. The Thank You sentiment is from a old Stampin' Up set "Many Thanks". I punched the left side of the line paper with the notebook punch from Stampin' Up. I then mounted it on a mat of Basic Black cardstock. I finished the card off with some staples and two Real Red brads from Stampin' Up.

ENJOY!!

Tuesday, June 25, 2013

Rose's Retirement card


Another retirement card for another retireing co-worker. This one is for my dear friend Rose. This Kraftin' Kimmie stamp reminded me of her. I stamper her on white cardstock and also on some pink pattern paper. I then coloured her with my copic markers. I cut the car from the pin pattern paper and paper pieced her to my image. I then cut my her out and placed her on the blue pattern piece of paper which I then cut with my nestability. For the next layer I cut some Melon Mambo cardstock with another nestability. I printed my sentiment with my computer onto my pattern paper. All the pattern paper is from the same 6x6 paper pad. The ribbon is Rose Red Grossgrain from Stampin' Up. To finish of my card I added three Bella Blings to the left hand corner.

ENJOY!

Sunday, June 23, 2013

Jane's Retirement Card


This is a retirement card I made for one of my co-workers. I used a really old Stampin' Up set "Buzzin' By to say Hi". I stamped the image three time and water coloured each one with Stampin' Up water colour crayons. I then used foam squares to raise each level of the behive. The bees are stamped twice and raised. The wings on the bees are glittered to give them some sparkles. The base of the card is made with chocolate chip. The pattern paper is from Bo Bunny Autumn Splendor line. The ribbon and coduroy brads are from Stampin' Up. I apologize for the awful photo, I was using my cell phone as I forgot to take one before I gave it to her.

ENJOY!

Friday, June 21, 2013

Happy Birthday Collin


Does this card look familar? Our friend's son was having a lego party just after Rhys' party. I decided I loved the lego Thank You cards I made, so I changed the sentiment and made it into a Birthday card.

ENJOY!

Wednesday, June 19, 2013

Thanks a "Block" ...


I made this card to thank some of the people that were a huge help to me at Rhys' Lego Party. The Lego man is created totally from punches. The pattern paper is all left over scraps from making some Thank You cards you will see in a upcoming post. The Thanks speech bubble is from a CTMH set and stamped in Real Red. The base of the card is made from Real Red cardstock and a mat of Daffodil Delight. I recreated this card 5 times. Sorry for the bad lighting I took the photo in the late evening as the sun was setting.

ENJOY!

Monday, June 17, 2013

The LEGO Party


After weeks of planning and preparing the Lego Party came and went. It was a great time and everything ran really well. I wanted to show you a few pictures of some of the items I prepared for the party.

These are the loop bags I made. I bought the bags from Michael's and boughts matching cardstock for the circles. The circles are cut with a circle punch and then raised up with a foam square. In the loop bags were a colouring book, some lego man and lego block crayons, candy lego blocks, a glow bracelet and a man and car for them to build.


A close up of the bag.


This is my youngest rockin' it out on the Kareoke Machine.


This was the pin the head on the lego man game I made. Each kid got a lego head and got to draw their own lego face on it. They then each took a turn tyring to put the head on the body while being blind folded.

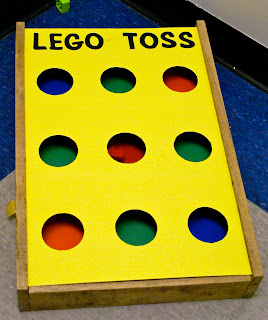
I made a lego toss game from a old bean bag toss game I found at work. The kids all loved trying to see how many blocks they could get in. 

I borrowed some legos from a friend at work. Her son has been collecting them for many years so his collection was quite a bit larger then ours. I had it all spread out on a table for the kids to build with. The boys really loved it and spent most of the time there.


Our friend's son created a really cool lego plane.


Rhys received MANY lego set for her birthday. Behind her is one of the banners I made a long with some help from my dear co-workers Emily and Nikki. They helped me to put on all the circles with foam squares.


I made these lego head treats from marshmellows and melted yellow chocolate. I then drew faces on them with melted chocolate chips and a zip lock bag with the corner cut off. I unfourtunately didn't get a picture before Rhys began to gobble it up. There was also a mini yellow M&M on the top to look like the little button on their heads.


 Rhys enjoying her Lego Treat.


Here is the large Lego Banner I made. I used the same items and method as the first banner and the Lego and loop bags.


ENJOY!!

Saturday, June 15, 2013

No Bones about it...


My friend Donna had used this stamp on a Birthday Card she made awhile ago. As soon as I saw it I knew I need to use it for a Retirement card for my Co-Worker John. I work in a x-ray department so the Skeleton is very fitting, as well as the sentiment "No Bones about it". The stamp comes from CTMH and I stamped him on Whisper White cardstock. The pattern paper is from the Neutrals Designer Series Paper pack from Stampin' Up.

I stamped the skeleton in Basic Black ink on Whisper White cardstock and matted with Basic Black cardstock. I then sewed around the edge with some white thread and my sewing machine. I stamped the Basic Balck Ink on some Smoky Slate cardstock. I then printed "You'll be missed" on Smoky Slate with my computer and printer. I finished off the card with some grey buttons from CTMH. The ribbon is from my stash of Bo Bunny Double Dot Ribbon.

ENJOY!!

Thursday, June 13, 2013

Rhys' Lego Digital Invitation


I made Rhys invite this year using My Design Studio from Stampin' Up. I also purchase a digital Lego pack from a online company. Unfortunately there was no Lego Figure with the package and I couldn't find one online. So I decided to make my own. The Lego Girl was made using punches from the My Digital Studio. I LOVE how she turned out! I also made the number 5 out of Lego block pictures that were in the kit I bought. When I was done I save the file as a jpg and took the it to Shoppers Drug Store and had them printed as a 4x6 photo. Make the creation took time but it was a lot faster then hand making them all. I then took the same file and changed the information to make invites for our family Birthday Party.

Tuesday, June 11, 2013

Meg's Recipe box


I made this recipe box for a Co-Worker's daughter, the same one that I made the Shower Invites for in the previous post. With the Shower invitation they sent recipe cards for the guests to fill out with their favorite recipe. The box is made to match the invitation.

I used the same jar stamp and flowers on the invite as the box. The pattern paper is from a old Stampin' Up Christmas line. I cut the Title using my Gypsy and Cricut in the same patter paper as I used on the lid of the Box. I used the Stampin' Up 7/16 Natural Trim ribbon to go around the edge of the lid and on the clipboard.

The clipboard is made with the same patter paper as the outside of the box. I used Soft Suede to mat the pattern paper before placing it on the clipboard. The "Bon Appetit" is from a old Stampin' Up set and is stamped using Soft Suede ink. The Salt and Pepper shakers are from a old Stampendous stamp set, they are also stamped in Soft Seude Ink. I used the same ribbon as on the lid of the box.

ENJOY!

Sunday, June 9, 2013

Happy 30th Birthday!!


Our friend Katie Celebrated her 30th Birthday last month. I decided to make another Easle Card like the 60th Birthday Card I made a little while ago. The 30 was cut using my Gypsy and Cricut. The card base is made from Sage Shadow cardstock and the mats are made using Crumb Cake cardstock. The pattern paper on the backrgound is from one of my 6x6 paper packs from my stash.

The pattern paper on the 30 is from Bo Bunny and I used some Vintage Photo Ink from Tim Holtz to ditress the paper and tone down the pink a little. The ribbon is from my stash of Bo Bunny Double Dot Ribbon. The postage stamp is made using the postage punch from Stampin' Up.

The Sentiment is from Stampin' Up's "Bring on the Cake" and it is stamped with Basic Black Ink. I punches the edge of the pattern paper with the discontinued Notebook Edge punch from Stampin' Up.

ENJOY!

Friday, June 7, 2013

A Whirly Birthday!


My little cousin's baby turned 1 last weekend. I love how the card turned out and I am planning on making a few more for my stash. The Pinwheel stamp set is from CTMH and I stamped the different layer using Pumpking Pie, Tempting Turquoise, Lucky Limeade Ink and Pacific Point Ink. The layers were all cut on my cricut using the CTMH Philosphy Cartridge. The pattern paper is from one of my 6x6 paper packs. I sewed around the edge of the paper with some white thread and a zig zag stitch on my sewing machine. The sentiment is from the new Stampin' Up hostess set "Banner Greetings" and is stamped in Tempting Turquoise. I used a Glitter Brad and some Lucky Limeade Baker's Twine to finish it off.


The inside of the card is made with Whisper White cardstock. I drew a line around the outside with a Tempting Turquoise marker. The sentiment is from Stampin' Up's "Bring on the Cake" Stamp Set. The stars are from CTMH Pinwheel set and are stamped using Pumpkin Pie, Lucky Limeade, and Tempting Turquoise Ink.

ENJOY!

Wednesday, June 5, 2013

Happy Birthday Morgan!


Rhys' best friend had her 5th Birthday last weekend. Her and Rhys are born 10 days apart and are inseperable! This is the card I came up with for her Birthday. I wanted to try out the new Designer Series pattern paper "Quatrefancy" from Stampin' Up. The stamp is one of my many Lulu stamps from Kraftin' Kimmie. The sentiment "Hoopy Birthday" came with the stamp and I stamped it using Island Indigo ink. I stamped her on Whisper White cardstock and coloured her with my copics. The bow is Daffodil Delight 3/8 Taffeta Ribbon from Stampin' Up. The pompom ribbon is a discontinued item from Stampin' Up. I sewed around the edge of the card with my sewing machine and some white thread.


The inside of the card is made with Whisper White cardstock. I drew a line wround the card with Island Indigo marker. The Cupcake in the corner is from a retired Hostess set from Stampin' Up. The sentiments are also from Stampin' Up and are stamped using the new Strawberry Slush Ink.

Enjoy!

Monday, June 3, 2013

Bike Diaper Cake


While on a baby theme. I thoughts I would share the Motorcycle Diaper Cake I made for a friend having a Baby Girl. My mom and me watched several You Tube Videos and then decided to try tackling it ourselves. I love how it turned out!! The whole thing is made from 33 size 1 diapers, 2 bibs, 4 receiving blankets, 1 bottle, and a pair of socks. I plan to try this again for another special baby that is on the way but maybe this time I will try making a three wheeler!


ENJOY!

Tuesday, May 28, 2013

Congratulations!


Suprise, Surprise, It's another baby card. I am begining to think this is the year of babies. This one is for Rhys' teacher. Rhys came home very excited that her teacher at school is going to have another baby. We have really enjoyed having her as a teacher this year and Rhys loves her. I am really excited because her timing is perfect and she will be back just in time for when Rhylan starts school. Lol!

The base of the card is made using Rich Razzleberry cardstock. All of the pattern paper is from one of my 6x6 paper pads from my stash.I stamped the Pregnant Bella image from Stamping Bella onto Whisper White cardstock with Momento Ink. I also did some paper piercing on the chair and her shirt. I coloured the reest of the Bella image with copic markers. I cut the images out using a Oval Nestabilities and layered it with a Scalloped Oval Nestability of Rich Razzleberry. The Congralutation sentiment is made with Stampin' Up's Bitty Banners stamp set and matching dies. The ribbon is a misc piece from my ribbon stash that I turned over and used the back side instead of the stripped side.


The inside sentiment is from Stampendous and is Stamped with Baja Breeze Ink. I used my left over scraps from the front to decorate the inside.

ENJOY!!